古人智慧
Just Do it!
上士聞道,勤而行之;中士聞道,若存若亡;下士聞道,大笑之。不笑,不足以爲道。
~ 道德經 41
「實現夢想不是追逐成功,而是在於賦予生命意義,人生中的每個決定與聲音都有其重要含義。」"The key to realizing a dream is to focus not on success but on significance — and then even the small steps and little victories along your path will take on greater meaning."
電視名人-歐普拉·溫芙蕾(OPRAH WINFREY)
搜尋此網誌
Translation
2019年12月12日 星期四
2019年10月12日 星期六
[家電維修篇] 養生鍋 - 3D打印機的應用
因緣際會收到這只故障的電熱玻璃壺。
上網搜尋後,原來這叫做
養生鍋,活到老學到老~~症狀:
上電後,控制器開關的指示燈有亮燈,但是
養生鍋主體的指示燈不亮,也不發熱。問題分析:
初級分析是使用電表量測是否有短路與接觸不良的現象。
[o] 在控制器端,兩段式開關切換時,電壓110v與12v都正常輸出。
[x] 本體玻璃壺沒作動,判斷這部分有問題,拆機維修
[o] 在控制器端,兩段式開關切換時,電壓110v與12v都正常輸出。
[x] 本體玻璃壺沒作動,判斷這部分有問題,拆機維修
拆機維修
打開底座,發現這
養身鍋有個安全鈕的設計,但這個結構件似乎破損遺失。
功能測試:
修理這部分不難,但是手上並無這個安全鈕的結構件,這時候~鐺鐺,3D打印機就是咱們好朋友~~~
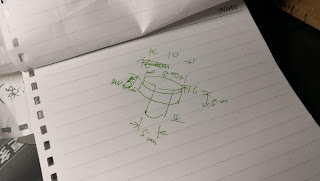
首先,用尺規量這個安全鈕的尺寸,在紙上畫好示意圖
首先,用尺規量這個安全鈕的尺寸,在紙上畫好示意圖
再來用
SketchUp來3D建模
接下來,用Cura切片app,因為這安全鈕時常壓住,所以我設定填充率100%,層高0.1mm
不到10分鐘,成品就出爐了
有個“大”插曲,這個打印機固定擠出頭的結構件
碎了 碎了 碎了!!!
用鐵絲固定來急救~~~~
還好,可以把安全鈕印出來。
裝上養生鍋一切正常,讚啦!
還好,可以把安全鈕印出來。
裝上養生鍋一切正常,讚啦!
紅色的安全鈕更顯眼,好看!!!測試視屏
完工了,功能正常!
2019年9月15日 星期日
[Python] 解決 matplotlib 在 Jupyter 無法顯示中文的方法
Jupyter這個工具是學習Python的好工具。
但是,在顯示中文會有問題,google有不少解決方式,下列方式比較彈性與合適我。
但是,在顯示中文會有問題,google有不少解決方式,下列方式比較彈性與合適我。
環境:
MacOS
Python 3.7.4
Python 3.7.4
解決方法
在Jupyter內找出系統字型Font的名稱
import matplotlib
fm = matplotlib.font_manager.FontManager()
for f in fm.ttflist:
    print (f.name)
可以查到很多字型名稱。
在裡面找到帶有
這兩行設定這App要用的字型庫。
在裡面找到帶有
TC 的Font大部分應該是繁體字型,如果是SC是簡體字型。這兩行設定這App要用的字型庫。
plt.rcParams['font.sans-serif'] = 'Noto Sans Mono CJK TC'
plt.rcParams['axes.unicode_minus'] = False
我用這個字型為例
%pylab inline
x = linspace(-5, 5, 2000)
#plt.rcParams['font.sans-serif'] = 'Noto Sans CJK TC'
plt.rcParams['font.sans-serif'] = 'Noto Sans Mono CJK TC'
plt.rcParams['axes.unicode_minus'] = False
plot(x, sinc(x))
plt.gcf().set_size_inches(20, 8)
plt.title(u'sinc(x)圖形', fontsize=25)
plt.xlabel(u'-5到5範圍', fontsize=25)
plt.ylabel(u'sinc(x)', fontsize=25)
plt.tick_params(axis ='both', labelsize=25)
plt.savefig('sample.jpg')
結果如下:
2019年9月1日 星期日
風扇維修 - 啟動電容 與 溫度保險絲
電風扇應該是每個家庭必需品吧? 我自個就擁有4部風扇。。。
台北夏天非常炎熱,擔心貓在家會中暑,所以成天開著風扇讓室溫降低與通風。
連續開了幾天,結果突然罷工!
修這個電扇馬達之前,大多只是做上油與清理灰塵的保養工作,這次特別想好好研究與Debug。
台北夏天非常炎熱,擔心貓在家會中暑,所以成天開著風扇讓室溫降低與通風。
連續開了幾天,結果突然罷工!
修這個電扇馬達之前,大多只是做上油與清理灰塵的保養工作,這次特別想好好研究與Debug。
進入維修主題:
這個是今天主角:
1. 拆機:
2. Debug:
風扇有兩個重要的零件,
首先,先確定風扇故障現象,如果馬達有嗡嗡的叫聲,那

然後,觀察馬達是否有做動。 這馬達完全沒動作,經過Google後,發現馬達線圈裡有埋個“
確定這兩個零件要更換。
馬達與啟動電容。首先,先確定風扇故障現象,如果馬達有嗡嗡的叫聲,那
啟動電容大概已經掛了。也可以從外觀是否有隆起的現象。如下圖,我的啟動電容已經微微隆起,應該沒掛也撐不了太久。
然後,觀察馬達是否有做動。 這馬達完全沒動作,經過Google後,發現馬達線圈裡有埋個“
溫度保險絲“,用電表量測是否溫度保險絲已經熔斷。確定這兩個零件要更換。
3. 維修:
4.測試:
5. 清理灰塵與組裝:
完成~~~
2019年8月15日 星期四
[Object Detection by Tensorflow] 物件辨識
Here is just do some note for how to setup and install the object detection by
Tensorflow on Raspberry Pi 3B+.
The original article here
Ok, let’s go my practise.
1. Update the Raspberry Pi
sudo apt update
sudo apt upgrade
sudo apt autoremove
2. Install Tensorflow, OpenCV and related Python modules
Refer to here
You should install this tool as well.
You should install this tool as well.
sudo apt install protobuf-compiler
3. Setup the Tensorflow models
mkdir tf_objectdetect
cd tf_objectdetect/

git clone https://github.com/tensorflow/models
Download/unzip the pre-trained model in this folder
wget http://download.tensorflow.org/models/object_detection/ssdlite_mobilenet_v2_coco_2018_05_09.tar.gz
tar -xzvf ssdlite_mobilenet_v2_coco_2018_05_09.tar.gz
Copy this file
models\research\object_detection\data\mscoco_label_map.pbtxt to data folder.mkdir data
cp models/research/object_detection/data/mscoco_label_map.pbtxt data/.
compile the protos database
cd models/research/
protoc object_detection/protos/*.proto --python_out=.

cd models/research/
export PYTHONPATH=$PYTHONPATH:`pwd`:`pwd`/slim
It will be better that add this line to
.bashrc# for tensorflow object detection
export PYTHONPATH=$PYTHONPATH:/home/pi/tf_objectdetect/models/research:/home/pi/tf_objectdetect/models/research/slim
4. Do the Object detection
Download the code, and test
cd ~/tf_objectdetect
wget https://raw.githubusercontent.com/EdjeElectronics/TensorFlow-Object-Detection-on-the-Raspberry-Pi/master/Object_detection_picamera.py

python3 Object_detection_picamera.py
You may got problems just like me, do some modify would be solved as below process.
nano Object_detection_picamera.py
nano Object_detection_picamera.py
Line 52from object_detection.utils import label_map_util
from object_detection.utils import visualization_utils as vis_util
Line 66PATH_TO_LABELS = os.path.join(CWD_PATH,'models/research/object_detection/data','mscoco_label_map.pbtxt')
That is and you will be ok for this practise
訂閱:
文章 (Atom)


