DIY﹣Arduino, 3D printing, CNC, Linux and Machine Learning.
古人智慧
Just Do it!
上士聞道,勤而行之;中士聞道,若存若亡;下士聞道,大笑之。不笑,不足以爲道。
~ 道德經 41
「實現夢想不是追逐成功,而是在於賦予生命意義,人生中的每個決定與聲音都有其重要含義。」"The key to realizing a dream is to focus not on success but on significance — and then even the small steps and little victories along your path will take on greater meaning."
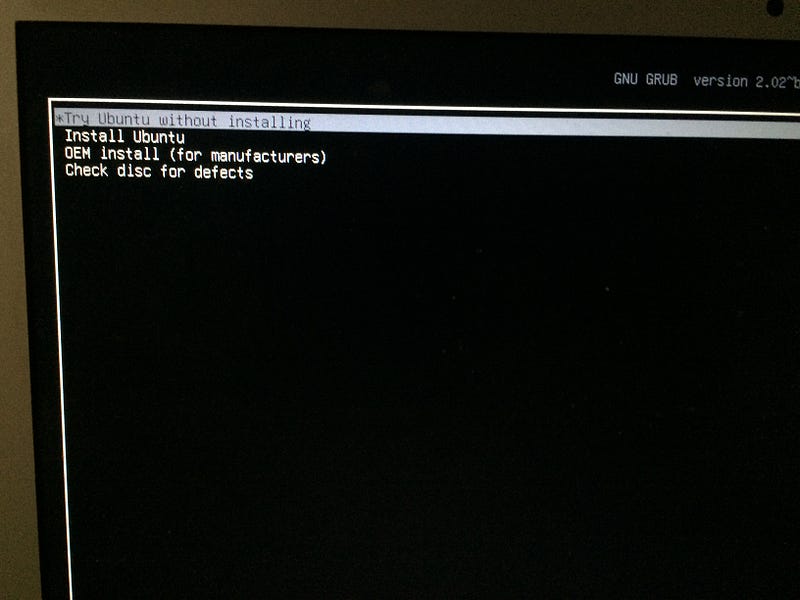
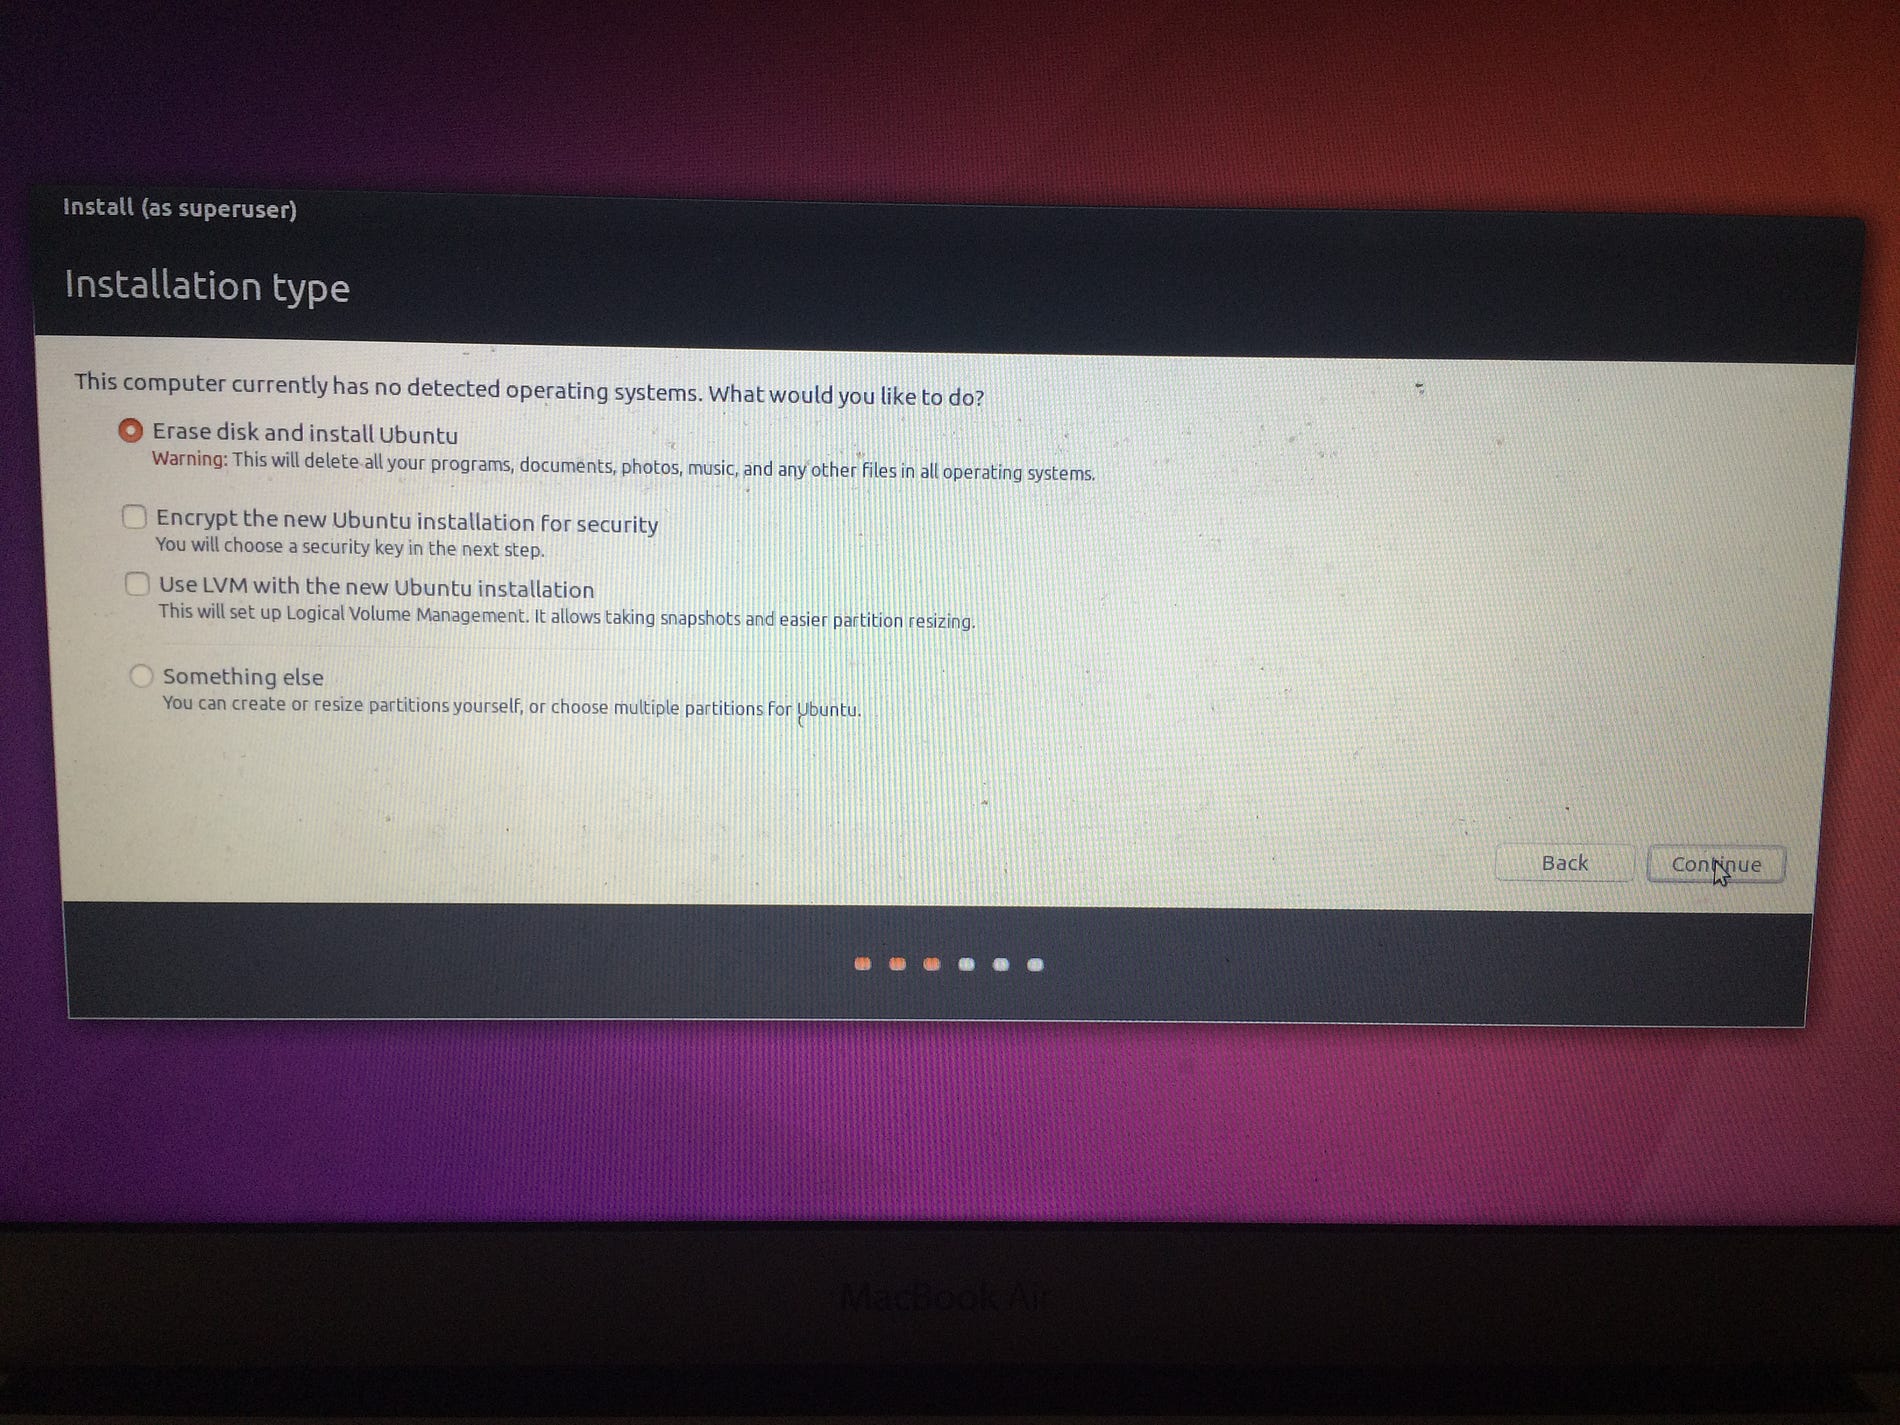
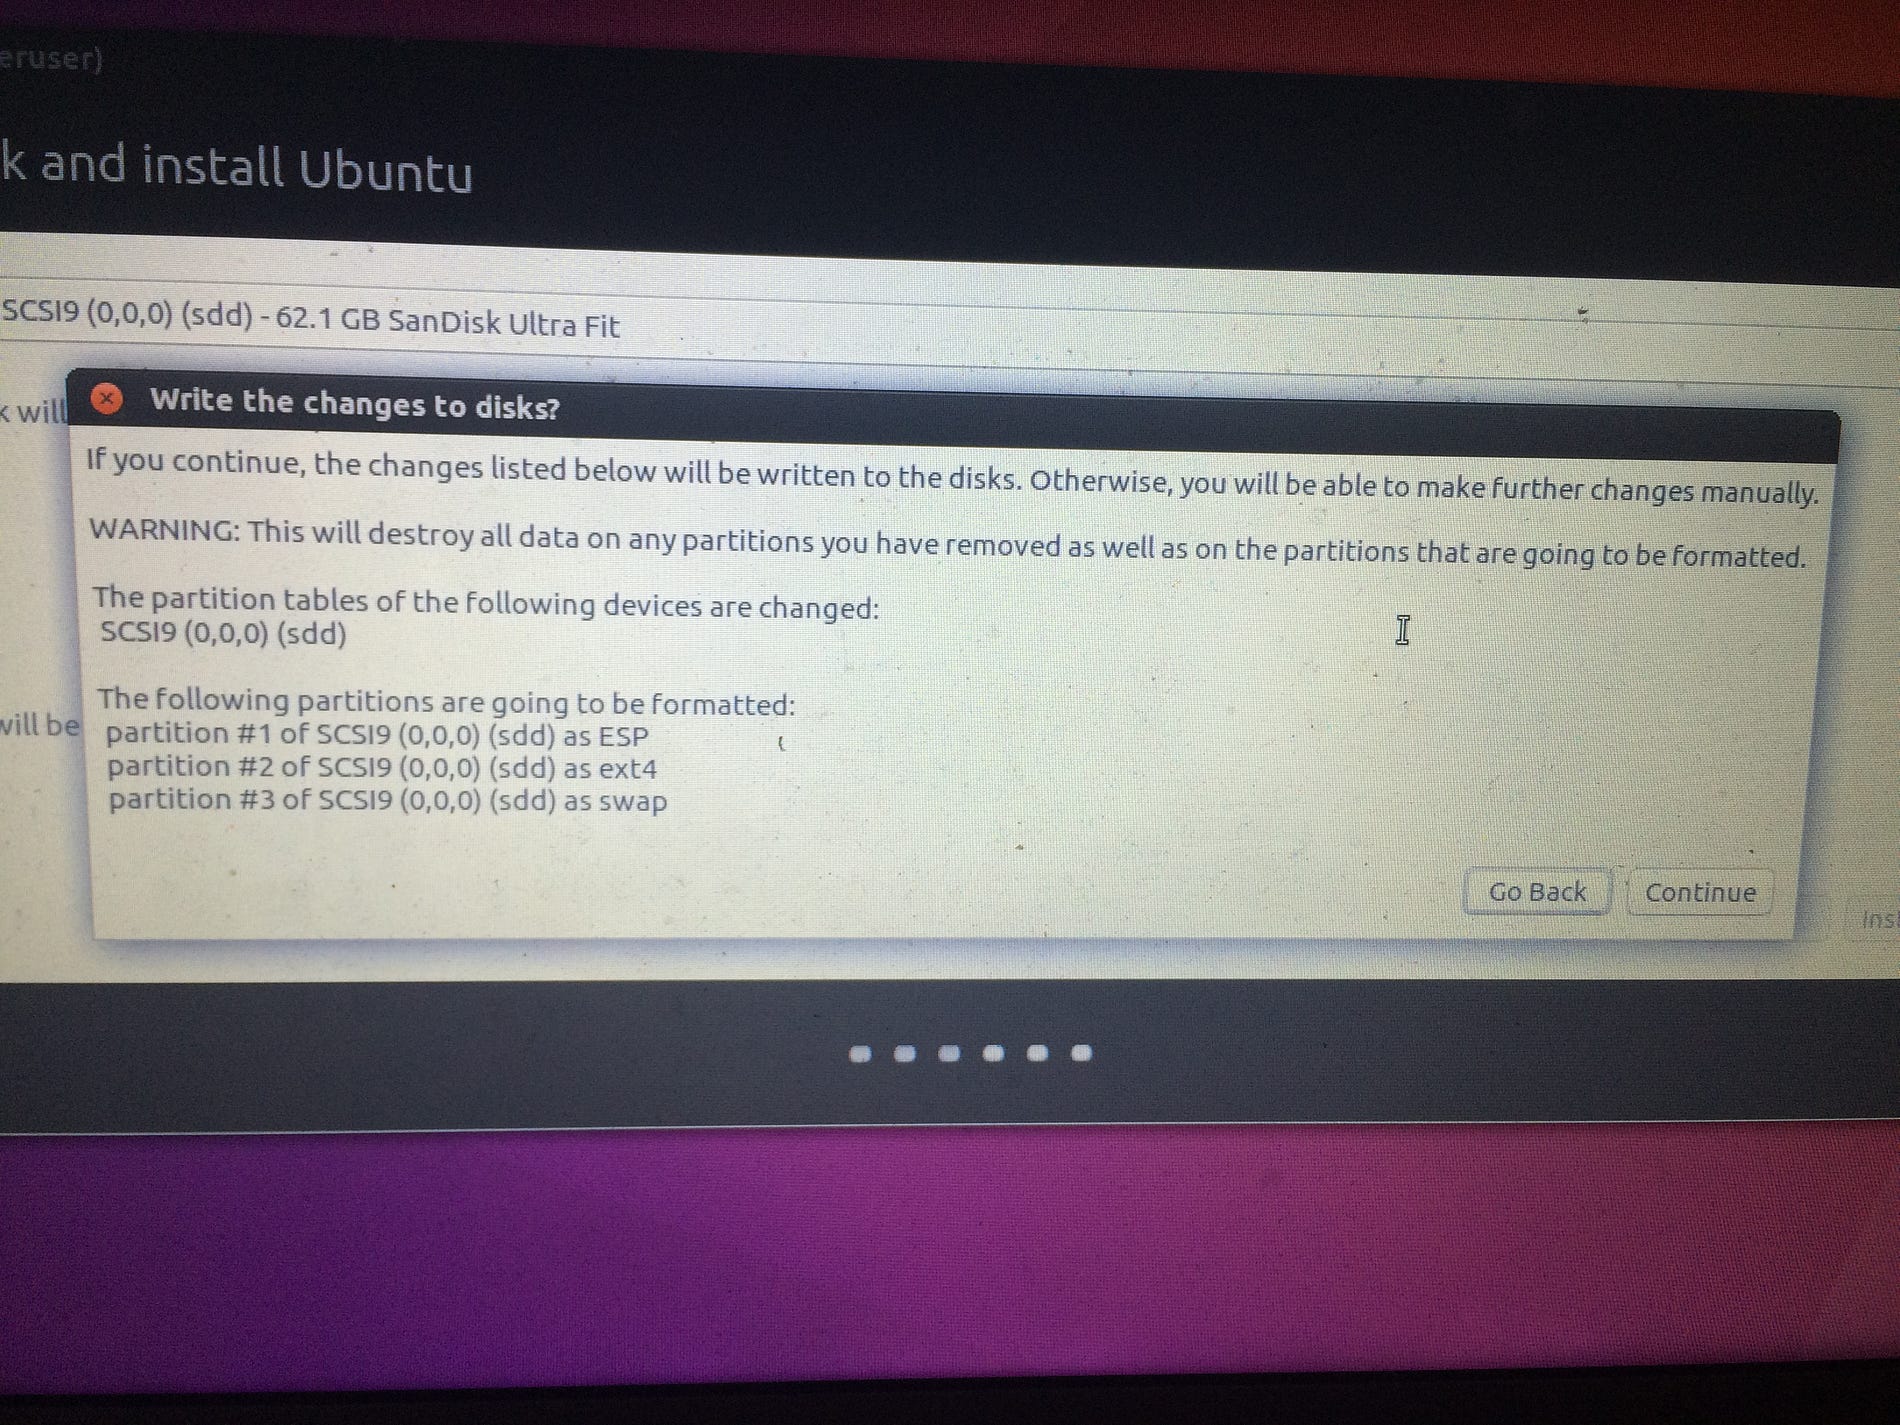
繼續正常的安裝步驟:選擇您的語言,選擇是否要安裝第三方軟件bla bla ...您可能會提示,然後提示您是否要卸載目標USB驅動器的任何分區,然後再訪問這一步,如果發生,點擊“是”。最後到達“安裝類型”屏幕。選擇“擦除磁盤並安裝Ubuntu”:
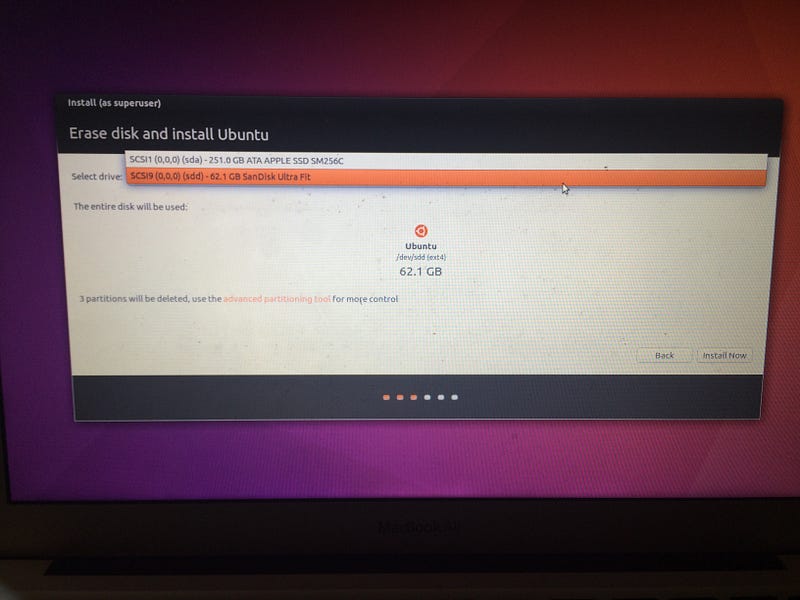
點擊“繼續”,現在非常小心選擇正確的驅動器。在“選擇驅動器”下,您應該找到並選擇您的目標USB硬盤,在我的情況下“sdd”。如果選擇內部硬盤驅動器(通常是“sda”),您將清除所有的OS X安裝和數據。
So why is the system unbootable? The problem is that the Mac bootloader expects the EFI partition to be formatted as HFS+, the typical Mac filesystem. It also expects certain files to be present. The Ubuntu installer actually formats it as VFAT and doesn’t create the files that are necessary for booting on a Mac.
The first thing you’ll need to do is to install some extra utilities. Fire up the Terminal and enter:
$ sudo add-apt-repository ppa:detly/mactel-utils
[...]
 Utilities for Intel based Macs (eg. recent MacBooks, Mac Minis). Includes a
 fan control (macfanctld) and the HFS "bless" utility.
 More info: https://launchpad.net/~detly/+archive/ubuntu/mactel-utils
Press [ENTER] to continue or ctrl-c to cancel adding it
Press enter to add the PPA. Then update your package list and install the necessary utilities:
In my case, it is /dev/sdd. We now use gdisk to delete the VFAT partition and create an HFS+ one. gdisk is interactive, and doesn’t write changes to the disk until you tell it to, so don’t panic if you make a mistake. Replace sdd with your USB device name.
$ sudo gdisk /dev/sdd
GPT fdisk (gdisk) version 1.0.1
Partition table scan:
  MBR: hybrid
  BSD: not present
  APM: not present
  GPT: present
Found valid GPT with hybrid MBR; using GPT.
Command (? for help):
Print the partition table and confirm that the first partition has type EF00:
Command (? for help): p
Disk /dev/sdd: ...
[...]
Number  Start (sector)  End (sector)  Size     Code   Name
   1         2048         1050623  512.0 MiB   EF00   EFI System Partition
[...]
Now we delete that EF00 partition:
Command (? for help): d
Partition number (1-3): 1
…and create a new HFS+ one in its place:
Command (? for help): n
Partition number (1-128, default 1): 1
Just press enter for the first and last sector options:
First sector (34-121307102, default = 2048) or {+-}size{KMGTP}:
Last sector (2048-1050623, default = 1050623) or {+-}size{KMGTP}:
…but enter AF00 for the filesystem code:
Current type is 'Linux filesystem'
Hex code or GUID (L to show codes, Enter = 8300): AF00
Changed type of partition to 'Apple HFS/HFS+'
Now we’re ready to write the changes. Use the p command to double-check your changes, and then w to write:
Command (? for help): w
Final checks complete. About to write GPT data. THIS WILL OVERWRITE EXISTING
PARTITIONS!!
Do you want to proceed? (Y/N): Y
OK; writing new GUID partition table (GPT) to /dev/sdd.
Warning: The kernel is still using the old partition table.
The new table will be used at the next reboot.
The operation has completed successfully.
Now we have an unformatted HFS+ partition. We can format it with (replace sdd with your USB device name):
$ sudo mkfs.hfsplus /dev/sdd1 -v Ubuntu
Initialized /dev/sdd1 as a 512 MB HFS Plus volume
For system partitions (eg. /, /boot, /boot/efi) Ubuntu uses the UUID (universally unique identifier) of a disk partition to mount it (rather than the device node, eg. /dev/sdd1). This means we need to update /etc/fstab:
$ sudoedit /etc/fstab
This will launch the nano text editor. Look the two lines that refers to /boot/efi:
# /boot/efi was on /dev/sda1 during installation
UUID=C59D-1B30  /boot/efi       vfat    defaults        0       1
Use ↓/↑ to position the cursor at the start of these lines and hit ctrl+K to delete them. Press ctrl+X and then Y to save and exit nano. Now, check that no partition is mounted on /boot/efi by running:
$ mount | grep /boot/efi
/dev/sda1 on /boot/efi ...
In my case, sda1 was mounted on /boot/efi. Unmount /dev/sda1:
$ sudo umount /dev/sda1
Then run this to add the necessary entries to your fstab file, replacing sdd with your USB device name:
$ sudo bash -c 'echo UUID=$(blkid -o value -s UUID /dev/sdd1) /boot/efi auto defaults 0 0 >> /etc/fstab'
Test it out by remounting /boot/efi:
$ sudo mount /boot/efi
Note that you shouldn’t use extra options here. If it doesn’t work from that command alone, it means your /etc/fstab entry is wrong.
If you run the previous command you should see your USB partition mounted on /boot/efi:
$ mount | grep /boot/efi
/dev/sdd1 on /boot/efi ...
Now we’ll reinstall GRUB so it can use the newly formatted HFS+ partition for its EFI data. First, create the necessary directory on the EFI partition:
The $(lsb_release -ds) part automatically produces a label for the distribution like Ubuntu 16.04 LTS.
Now, there’s a bug in GRUB that means that on HFS+ it requires a file named mach_kernel to exist in a particular place before it runs. In fact, it’s really the Mac bootloader that requires this file, but GRUB seems to look for it in the wrong place and refuses to run if it’s not there, so we need to create it twice:
$ sudo bash -c 'echo "This file is required for booting" > "/boot/efi/EFI/$(lsb_release -ds)/mach_kernel"'
$ sudo bash -c 'echo "This file is required for booting" > /boot/efi/mach_kernel'
Now we need to install GRUB, and we need to be a bit explicit about where it should put its files:
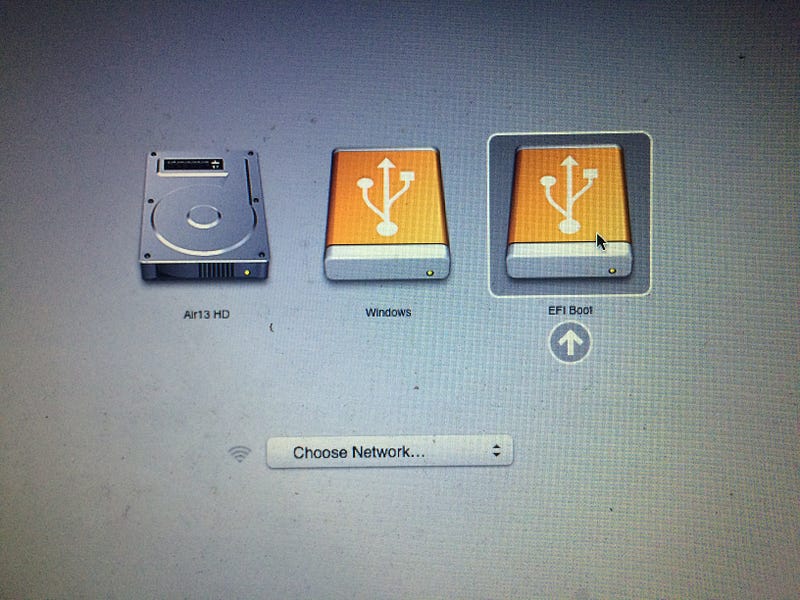
Reboot your system, press and hold the “option”/“alt” key and you should finally be able to boot Ubuntu from your USB key!
If you don’t press and hold the “option”/“alt” key at startup it should boot directly into OS X as usual. However the second time I went through all this process I’m not sure what I did wrong or what was different from the first time and by default my Mac was booting into Ubuntu. If it is also your case, try to mount your /dev/sda1 partition and remove the EFI folder in it:
This solved the problem for me. After reboot, OS X was again my default OS.
Final make up
If you are going to keep the USB always inserted, like me, you will notice that when starting OS X, the ESP partition will be automatically mounted. To prevent this, annotate the partition UUID by running from OS X: